

Sefthy is the ideal solution for Backup and Disaster Recovery of your devices, allowing you — in the event of failure or disruption — to continue accessing resources with the same local IP, as if nothing had happened.
To achieve this, several key components are involved: the Connector and the Backup Method. The Connector acts as a bridge between the local network, where the protected devices reside, and our Cloud, where they are restored in the event of a disaster. The Backup Method is responsible for saving devices backups to our storage, keeping the data up-to-date at all times and allowing you to choose the time point at which to restore the state of the device.
When Disaster Recovery is initiated, a Virtual Machine with the Recovery Operating System is started in our Cloud, which will ask you which restore point you wish to use.
Once the Recovery is complete, the Connector establishes a connection to the Virtual Machine allocated in the Cloud, making it accessible locally as if it were directly connected to your site.
The Connector is one of the fundamental elements for the operation of the Disaster Recovery.
The Connector's function is twofold:
- Under standard operating conditions, it monitors the status of the devices integrated into the Disaster Recovery Plan;
- When the Emergency Procedure is activated, it establishes a network link between the company infrastructure and the restored resources, ensuring accessibility without requiring changes to the existing network configuration.
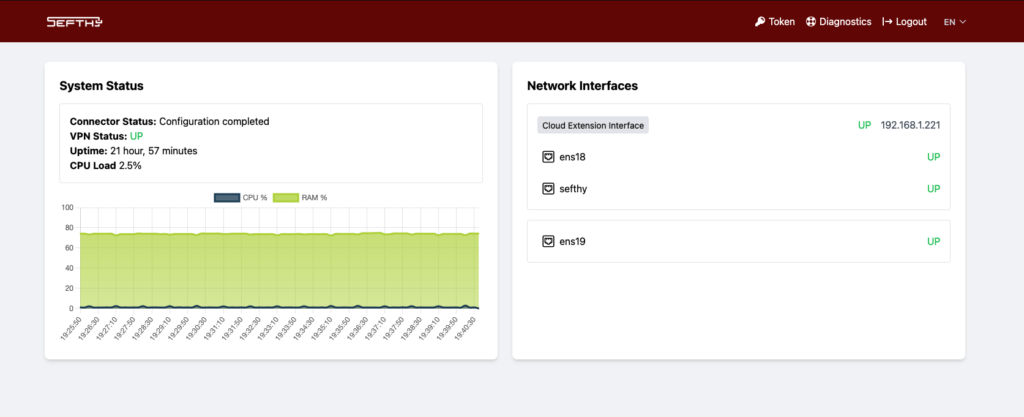
Within the Connector, in addition to the various service components, there is a web interface that allows the user to check operational status, change the network configuration, and perform diagnostic operations.
Three different types of connector are currently available:
- Connector installation on x86 Devices
- Connector installation inside Proxmox PBS
- Connector installation on Mikrotik devices
The Backup Methods currently available are Sefthy Agent and Proxmox PBS depending on the infrastructure you want to protect.
Sefthy Agent is ideal in both physical and virtual Windows/Linux* server or workstation environments and once installed you can monitor it and manage backup settings from our Sefthy Console.
Compatibility:
Learn more about Sefthy Agent installation
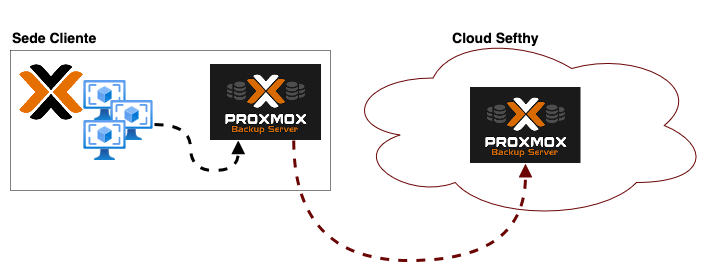
Proxmox PBS Backup Method is in fact the offsite replica of your own Proxmox Backup Server, always synchronized with the local PBS according to a scheduling managed autonomously by our Sefthy Console.
For proper operation, we have created an installation script that creates a user with limited privileges who has access to the local PBS to periodically fetch the desired VM backups.
Learn more about Proxmox PBS configuration as backup method
In order to create a new Disaster Recovery, it is necessary to add the data related to the customer or location where you want to deploy the DR.
Just log in, then go to Customers → Add Customer and fill in the required fields.
You are ready to create the DR from the Disaster Recovery section, through the Setup a new DR button. Choose the desired plan, give it an identifying name, and associate the customer.
Now you can configure the Connector and the preferred Backup Method.
Once activated the Disaster Recovery Plan within the Sefthy Console, you can add the Connector by selecting Add and choosing x86 Device from the available methods.
x86 Device installation
The ISO version of the Connector can be installed either on physical hardware or in a virtual machine within your own infrastructure.
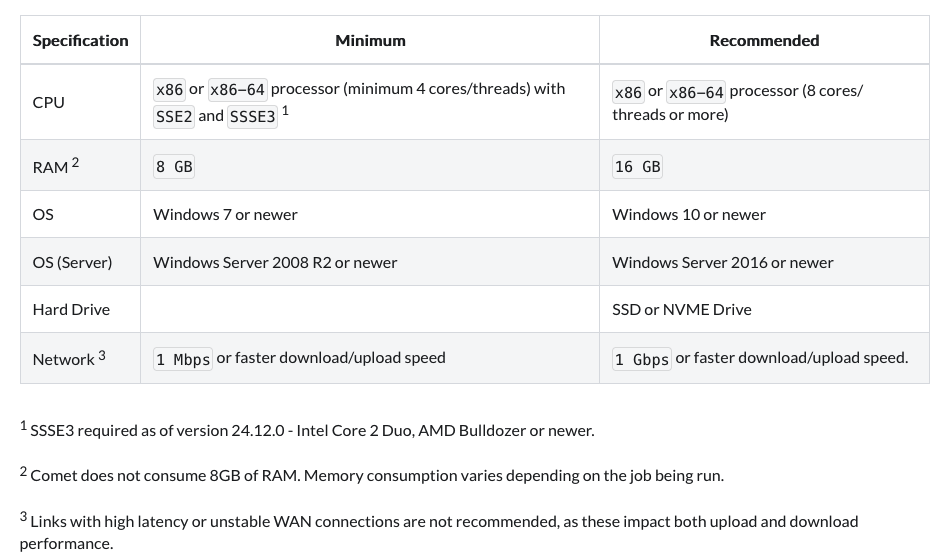
Below are the minimum resources required:
- 2 CPU cores
- 1 GB RAM
- 10 GB HDD
- 1 or 2 Ethernet NICS in BRIDGE MODE (not NAT mode)
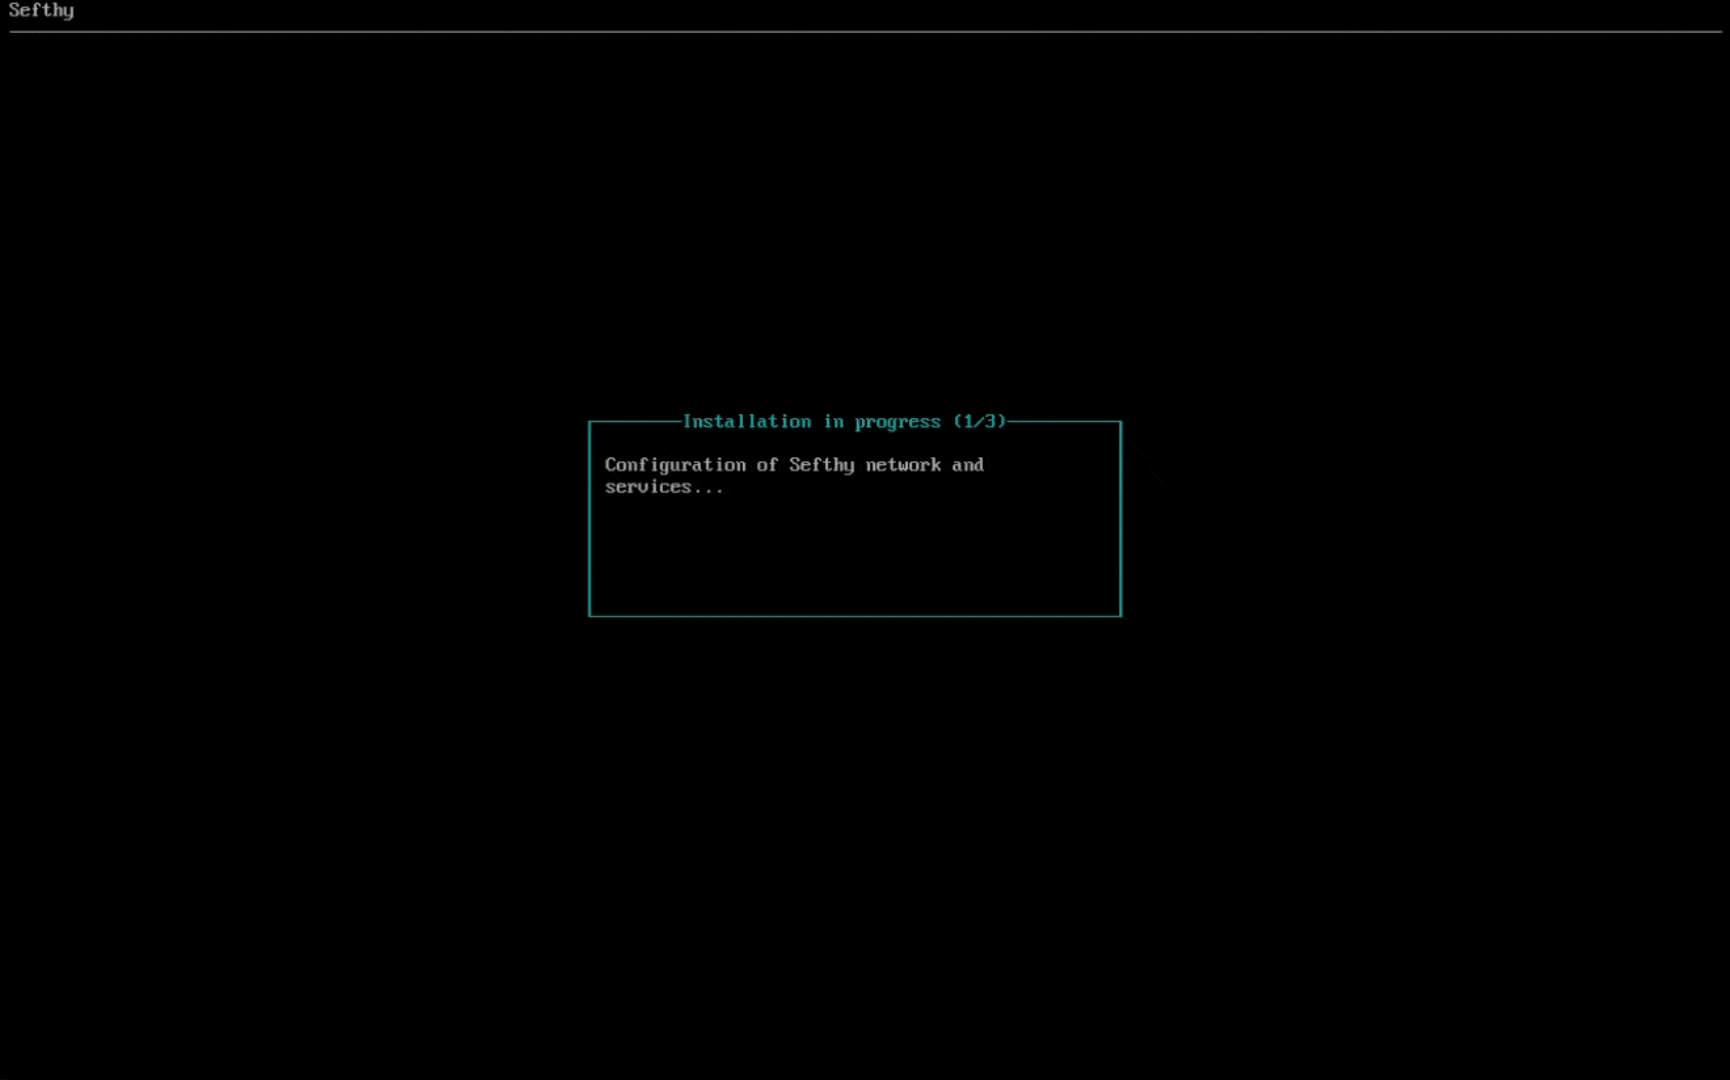
The installation, lasting about ten minutes at most, guides us in a few simple steps to configure the essential parameters for operation:
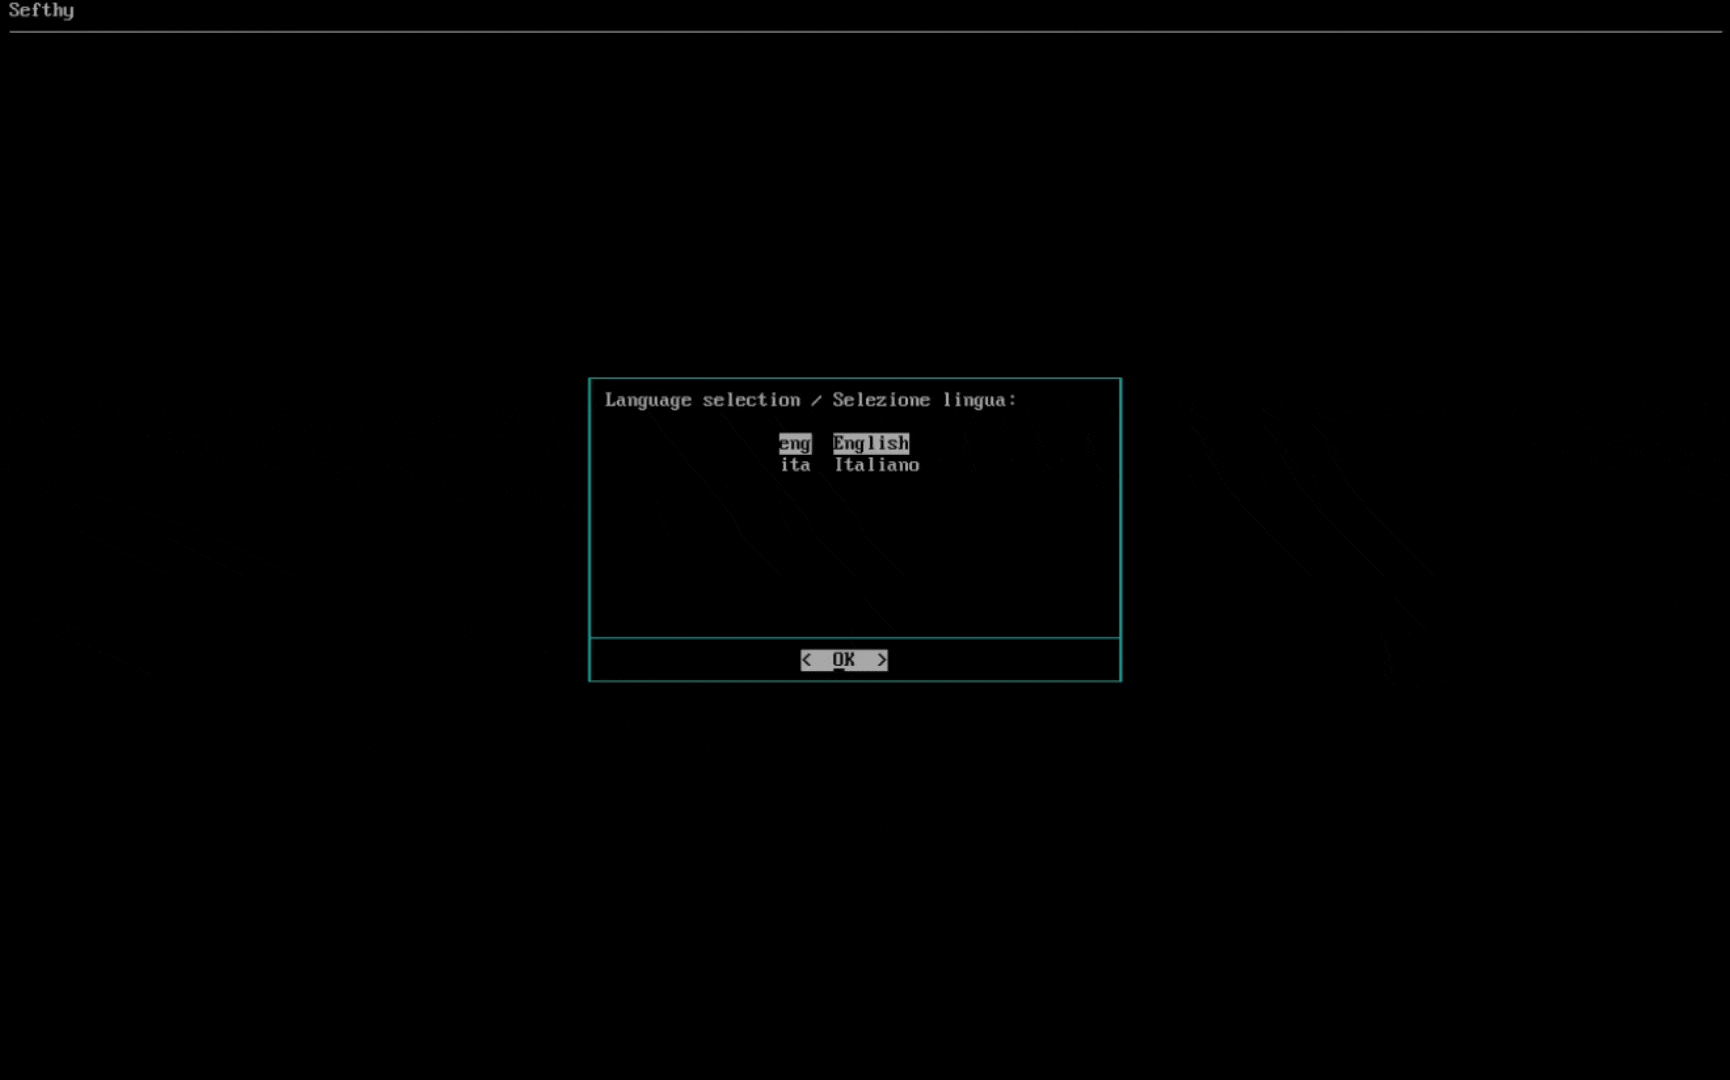
1. First we select the desired language.
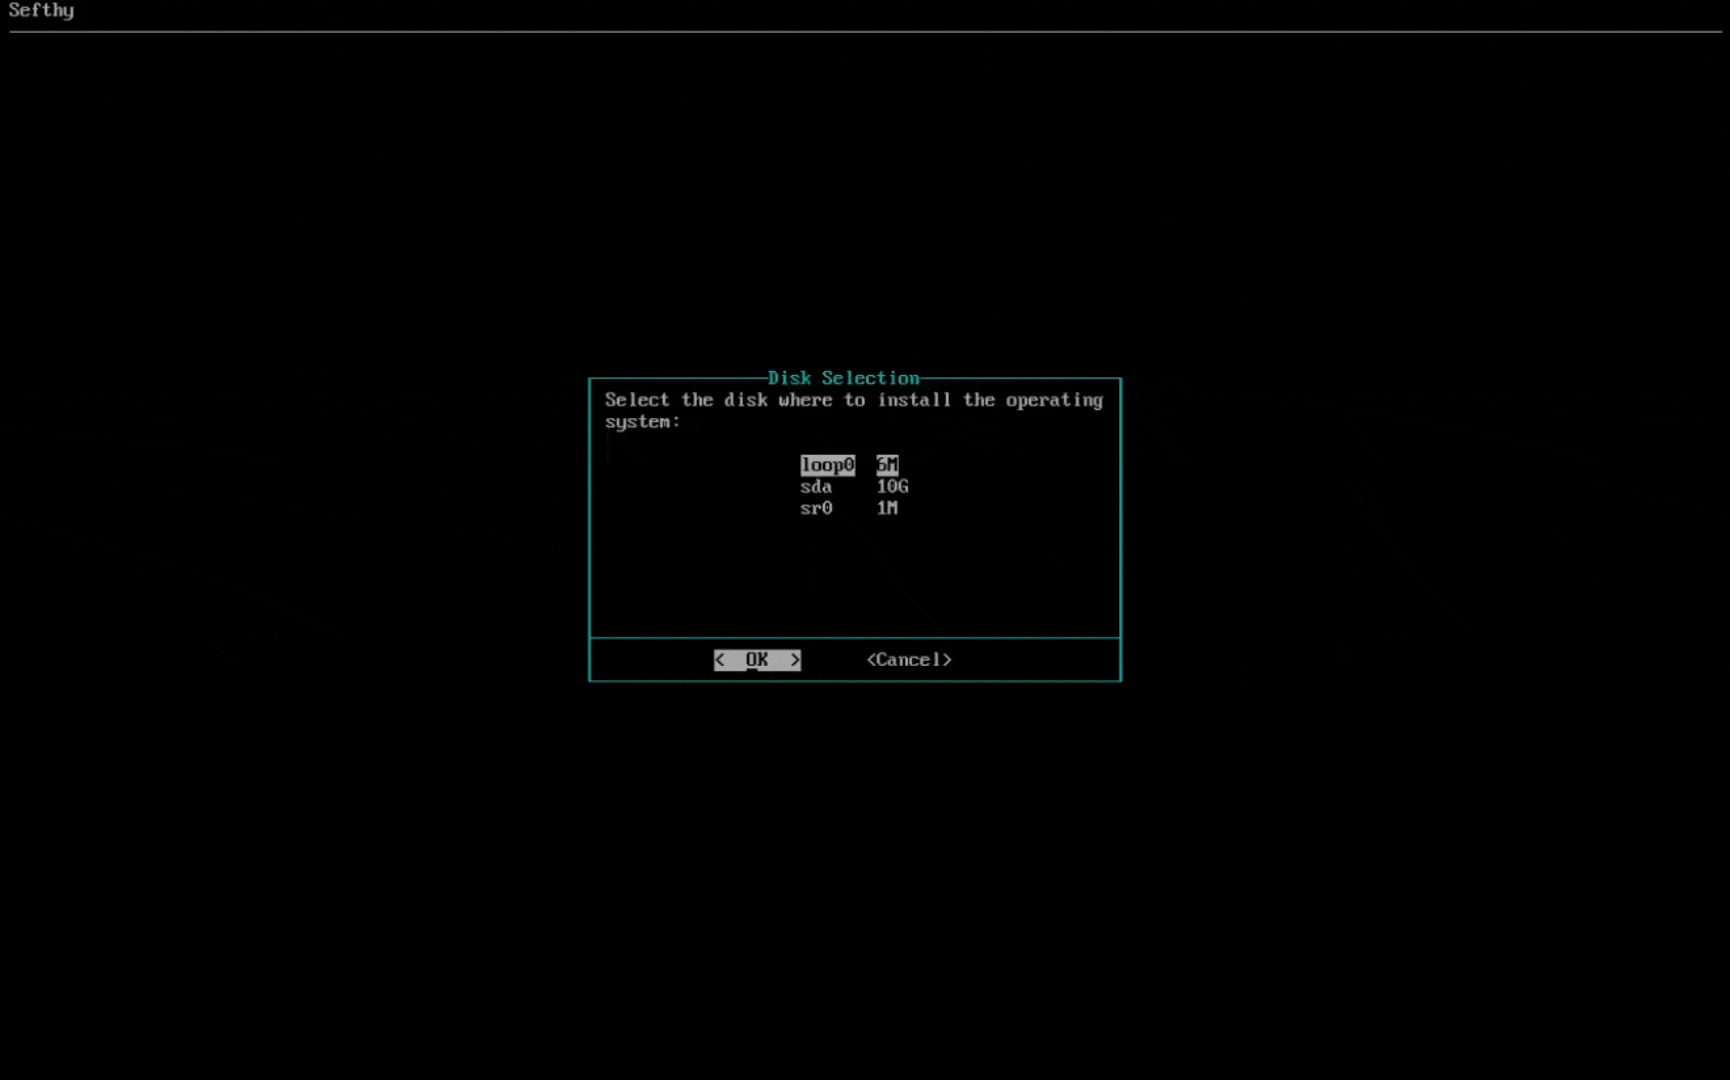
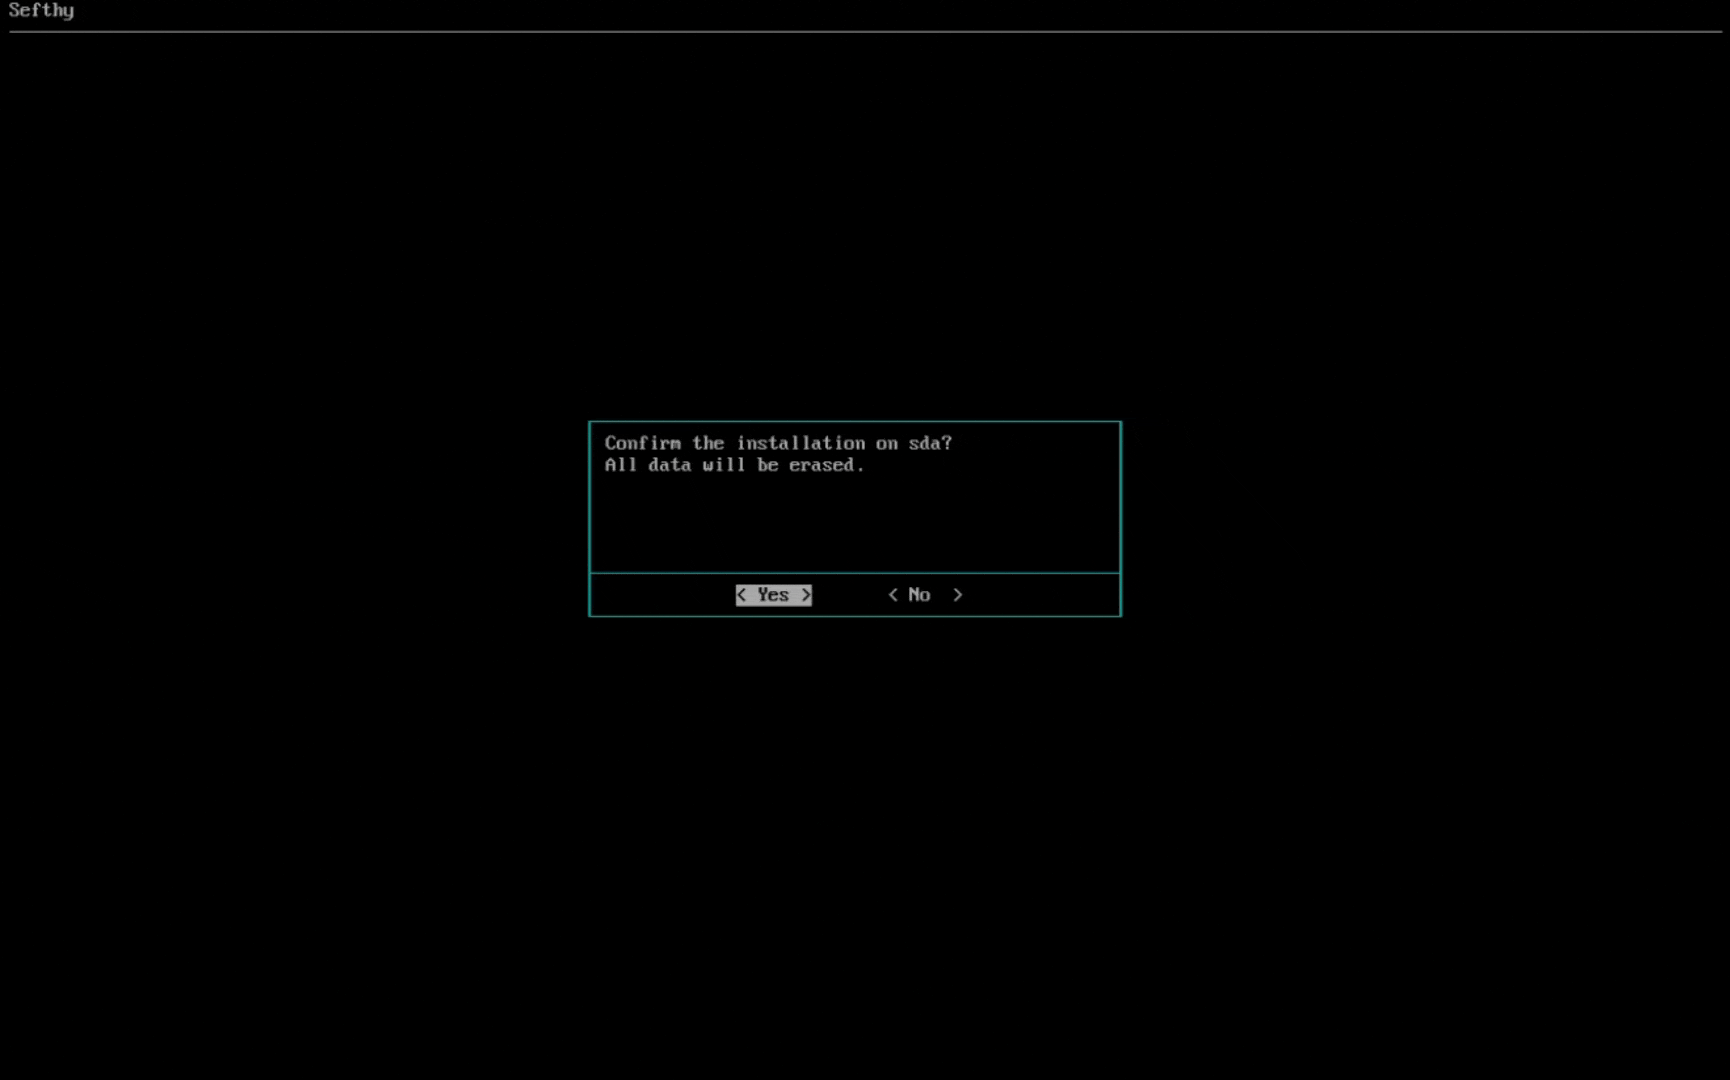
2. Choose the disk where the operating system will be installed.
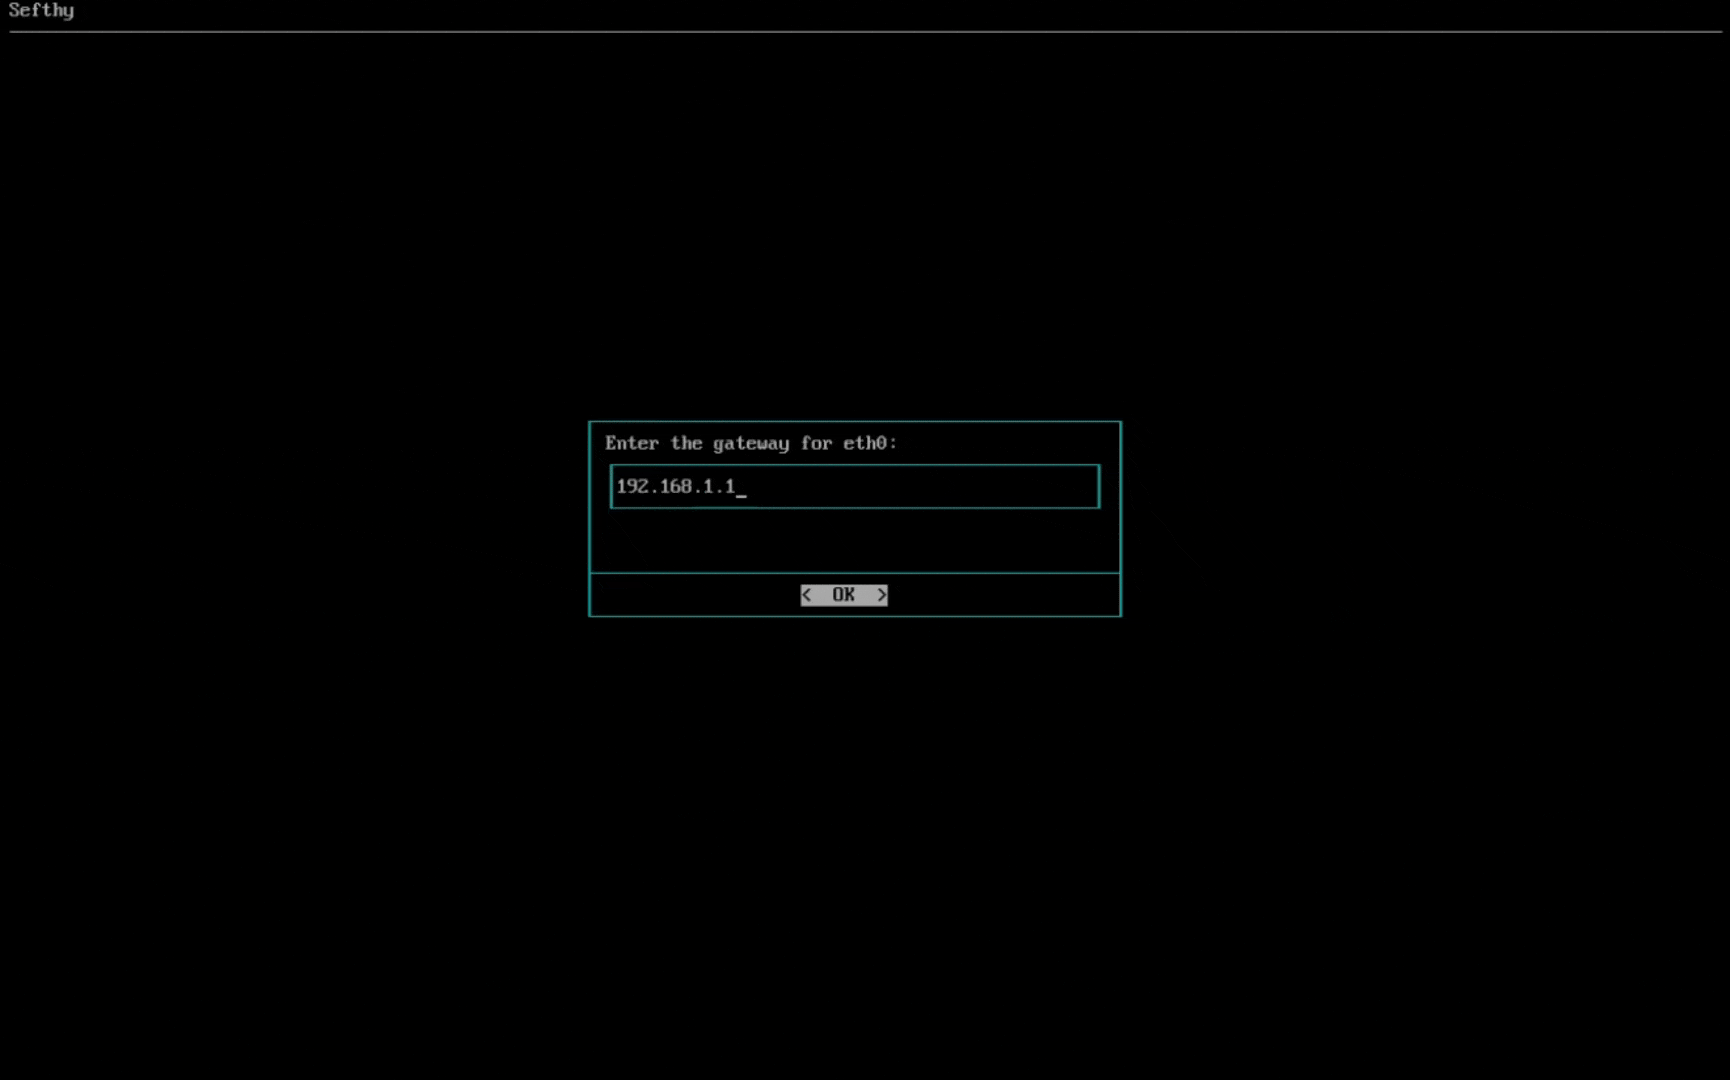
3. Select the network card that will allow our Connector to connect to our infrastructure through the Internet. You can choose the IP configuration between DHCP or Static (recommended).
4. Select the network card for Cloud Network Extension (it must be physically connected where the resources that need to use Disaster Recovery are present and be in BRIDGE mode, so the Connector can reach the same L2 broadcast domain of your device).
If you have only one network card, it can serve both as a gateway for the Connector and as an extension for DR.
5. Wait for the installation to complete. The installation will proceed with copying and configuring the system according to the parameters we chose in the previous steps.
At the end of the installation, simply remove the ISO and restart the machine.
Once the boot process is complete, you can connect to the connector's web interface to enter the Activation Token:
1. Go to http://<CONNECTOR_IP>
2. Log in with the default password: Sefthy. You will immediately have to choose a new custom password.
3. Go to the “Token” menu item and enter the activation key we provided.
Once activated the Disaster Recovery Plan within the Sefthy Console, you can add the Connector by selecting Add and choosing Proxmox Backup Server from the available methods.
Proxmox PBS installation
Similar to the x86 installation procedure, on Proxmox PBS the configuration consists of a guided procedure, launched through a script from the web interface shell or via SSH.
Run the command curl https://static.sefthy.cloud/pbs/install.sh | bash
The wizard will guide you through the installation steps:
1. Select the desired language
2. Select the network card for Cloud Network Extension (it must be physically connected where the resources that need to use Disaster Recovery are present). If you have only one network card, it can serve both as a gateway for the Connector and as an extension for DR.
Once the boot process is complete, you can connect to the connector's web interface to enter the Activation Token:
1. Go to http://<CONNECTOR_IP>
2. Log in with the default password: Sefthy. You will immediately have to choose a new custom password.
3. Go to the “Token” menu item and enter the activation key we provided.
Please note: to use the connector on Mikrotik routers, you must have a physical or virtual device (CHR) with arm64 or x86 architecture and RouterOS version >=7.
Once activated the Disaster Recovery Plan within the Sefthy Console, you can add the Connector by selecting Add and choosing Mikrotik Router from the available methods.
⚠️⚠️ Requirements ⚠️⚠️
On the router, if it is not already enabled, enable the Container package. To do this you must first download the extra packages corresponding to your router's architecture from the Mikrotik website, copy the container-*.npk file to the router's storage, and then reboot it.
Once rebooted, from the Winbox terminal, run the command /system/device-mode/update container=yes. You'll be prompted to remove the power to apply the changes.
Mikrotik Router installation
From Sefthy Console copy the commands to install the Connector and run it inside Winbox terminal or SSH.
Once the installation is complete, start the Sefthy Container (only needed the first time) and the web management interface will be available at http://172.17.255.2/ in a few seconds.
From this page we will be able to set the Activation Token and the lan bridge, where the device under backup is present, to be used in case of Disaster Recovery.
1. Go to http://172.17.255.2
2. Log in with the default password: Sefthy. You will immediately have to choose a new custom password.
3. Go to the “Token” menu item and enter the activation key provided.
4. In the “Network” section, select the bridge to be used in case of Disaster Recovery.
Within each DR we have the ability to customize the scheduling of the Backup Method so that they run at the best times relative to business needs and operations, achieving the best RPO possibile.
By default, Cloud Backup schedules are set as follows each day.
Sefthy plan: 01:00, 07:00, 13:00, 19:00
Sefthy PRO plan: 01:00, 04:00, 07:00, 10:00, 13:00, 16:00, 19:00, 22:00
By clicking on Backup Schedules in the Latest Activities section of our DR, we can select one of the blue column to remove a schedule or click at an empty column to set a new one at that time.
We can also set up Local Backups and DeepVerify, which allows us to periodically check the reliability of files stored securely in the Cloud.
Relative to Proxmox Backup Server as a Backup Method, you can similarly customize sync job schedules.
Within a DR, by clicking on the Backup Speed button, we can change the speed limits of Backups upload, according to our needs.
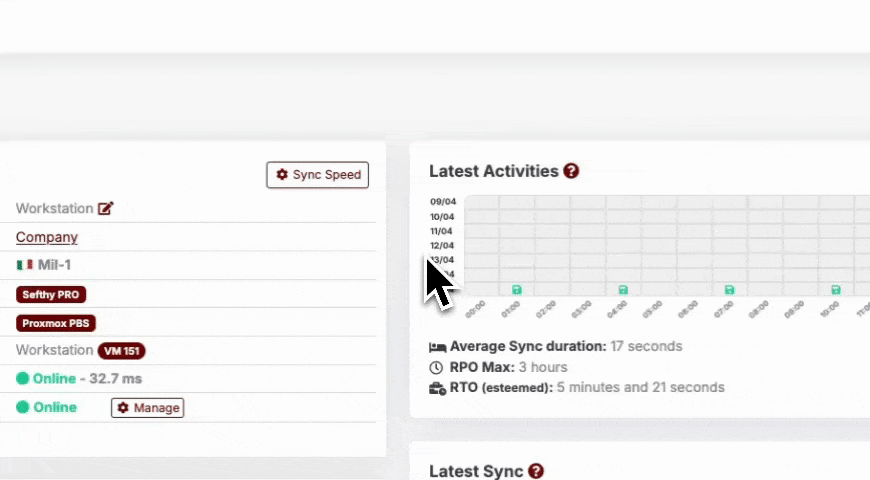
You can manually configure the limits, or you can do a Speedtest via the Connector and let the values set automatically accordingly.
Doing the Speedtest from the Connector, we check the upload speed of the company and set half of the value as the maximum Backup speed. In any case, the maximum speed can be customized at any time.
In the “Network” section of the Connector, you can change the network card or BRIDGE (in the case of Mikrotik devices) used for Cloud Extension.
Note: It is not possible to manage the network part on Proxmox PBS connectors. Any changes will have to be made through the PBS management interface.
x86 Devices Connectors:
Mikrotik Connectors:
In the Connector WebGUI there is a Diagnostics section, which is useful for troubleshooting network problems.
The tools available are: Ping, Traceroute and Speedtest.
At the bottom of the page, on the right, there is a semi-transparent red button for downloading system logs, which are helpful to attach to a technical ticket if necessary.
On Sefthy PRO plans, an Emergency VPN can be configured in case the Customer site is completely offline or compromised.
The VPN is based on Wireguard and allows you to:
- Remotely access one or more DRs associated with a Connector;
- Surf the Internet with a public IP (for both clients and restored devices).
To proceed with the configuration simply go into Connectors and select the desired Connector. From the detail page you can either manually add users or synchronize them with your own LDAP server (e.g. Microsoft's Active Directory).
In the Configuration box it is essential to set the gateway of the Emergency VPN, otherwise it will be impossible to activate the Emergency VPN. The gateway is the IP address/CIDR of your existing Customer site LAN (where the devices are connected).
The Monitor feature is used to periodically check the reachability status of the Sefthy-protected device by measuring latency and packet loss percentage.
The operation is quite simple: from the network interface connected on the internal LAN, 4 arping requests are made to the device, which if present will respond with its MAC Address, and from the responses received latency and packet loss are calculated.

Operating in Layer 2, arping allows us to check whether a device is actually connected to the network, regardless of some network/firewall misconfigurations of the device, which might limit the responses to the classic ping.
For each user level, whether partner or end user, it is possible to configure receiving notifications through email or Telegram.
To configure Telegram, start a chat with @sefthy_bot and it will print your Telegram ID to insert.
To configure SMTP Server, insert the parameters needed to send the notifications.
When at least one between Telegram and Email is configured, you can click on the Add button in the Alerts/Notifications section and select the type, client (in case your account is Partner), devices and channel through which to receive communications.